Never Mind the Billhooks: The Battle of Blackpool Sands, 1404
A story of (and scenario for) medieval-era combined operations going badly wrong, by Andy Callan.

In Wi402, Simon MacDowall described how to use my Never Mind the Billhooks rules to re-create the notorious 'Chevauchées' of the period – long distance raids into French territory aimed at destroying the enemy economically rather than militarily. But at the same time as these operations were cutting a swathe across rural France, the French and their allies were launching counter-raids across the Channel, this time using seaborne landings to terrorize English coastal communities.
To readers accustomed to taking England's later command of the seas for granted, it will come as a surprise to learn of her relative maritime weakness during the Hundred Years War. At those days, there was no English navy as such, only merchant vessels commandeered for royal service in times of war. This system had its uses and could occasionally bring high-profile victories at sea, such as Sluys (1340) and, ten years later, at Winchelsea (or 'les Espagnols sur Mer').
However, such triumphs were short-lived, and in the meantime, there was no regular system for protecting England's maritime trade or guarding her coasts - the routine but essential tasks for which a permanent naval establishment would have been required. Just as France proved too big to conquer, so the seas around England proved too big to control.
Enemy raiders could come and go with impunity and did so with depressing frequency throughout this period. Ships from France and her allies - including Brittany, Castille, Portugal, Genoa and Monaco - raided more or less at will all along the Channel coast. Plymouth, Dartmouth, Southampton, Portsmouth, Rottingdean and Rye were all sacked at various times, often more than once. Little Winchelsea, at one time a thriving port, was attacked no less than seven times and never really recovered. The English did mount raids of their own, of course, but generally seemed to be on the back foot.
Both the chevauchée and the coastal raid were cruel and ruthless in their effect on the civilian populations. The coastal communities must have spent their lives in fear both for menfolk in peril on the sea and in dread of what might come at any time from the sea. Arson, pillage and rapine are words that trip easily off the tongue, but the realities must have been unspeakably grim. And while Henry V might have joked (at the siege of Meaux) that “war without fire is like sausages without mustard” it wasn't his property that was being burned down, only that of the despised lower orders.
Just occasionally, however, the raiders didn't have it all their way, and the locals were able to strike back and turn the tables on their tormentors. This brings us back to the little-known 'battle' of Blackpool Sands, Devon, fought on 14th April 1404, during the reign of King Henry IV.
Fishwives and Frenchies
Well, OK, the raiders might have been mostly Bretons rather than Frenchmen, but let's not quibble if it gets in the way of a catchy title! The women of Dartmouth, however (amongst whom there were indeed many fishwives), certainly played an active part in this remarkable affair, which is set at just the sort of small-battle level for which the Billhooks rules were originally designed.
Background
In the early 1400s, the Hundred Years War was going through one of its 'colder' phases, with not much in the way of major Anglo-French military operations except for the ongoing and debilitating series of cross-channel raids and counter-raids described above. Henry IV was pre-occupied with threats to his authority on the English mainland both from fellow Englishmen (such as Hotspur) and an altogether more persistent rebellion in Wales led by the redoubtable Owain Glyndwr. The French were only too happy to stoke these fires of rebellion, and their ships and those of their Breton allies gave active support, assisting the Welsh in their operations against English strongholds along the Irish Sea coast and the Bristol Channel and even landing a substantial army at Milford Haven.
In the West Country, Plymouth had suffered a major raid in August 1403 with much of the town burnt down. By royal command, John Hawley of Dartmouth (see sidebar) and William Wilford of Exeter raised a fleet to launch a retaliatory raid in October and November of the same year. They captured 40 ships and 1000 tuns of wine before landing on the Penmarch Peninsula in the far west of Brittany and raiding up to 18 miles inland, causing much devastation.
A swift tit-for-tat response was inevitable, and this came in the Spring of 1404.
The Raid on Dartmouth, 1404
Arrogance and stupidity were not uncommon amongst French commanders of the Hundred Years War period, but for sheer bone-headedness, the generation that led armies between the battles of Nicopolis (1396) and Agincourt (1415) takes the biscuit. The French could produce some fine, level- headed soldiers but these professionals regularly found themselves over-ruled by doltish aristocrats who pulled rank on them to disastrous effect.
Blackpool Sands falls right in the middle of this nadir of the French art of war, and it seems that their Breton allies were infected with the same propensity to wreck their best-laid plans.
This expedition was strong and well founded – a large fleet of ships with upwards of two thousand soldiers on board - but it suffered from the outset from a divided command. The army included the retinues of Guillaume du Chastel (an experienced commander and supposedly the Admiral) and the lords of de Jaille and Chateaubriand, but relations between them were strained from the outset.
The voyage to England was not without incident. On the first day out from St. Malo, they encountered a convoy of merchantmen from Castile (supposedly an allied nation), which they nonetheless proceeded to capture and relieve of its cargo of wine. This caused a falling out between du Chastel and de Jaille, leading an exasperated Chateaubriand to abandon the expedition and take his ships home with him.

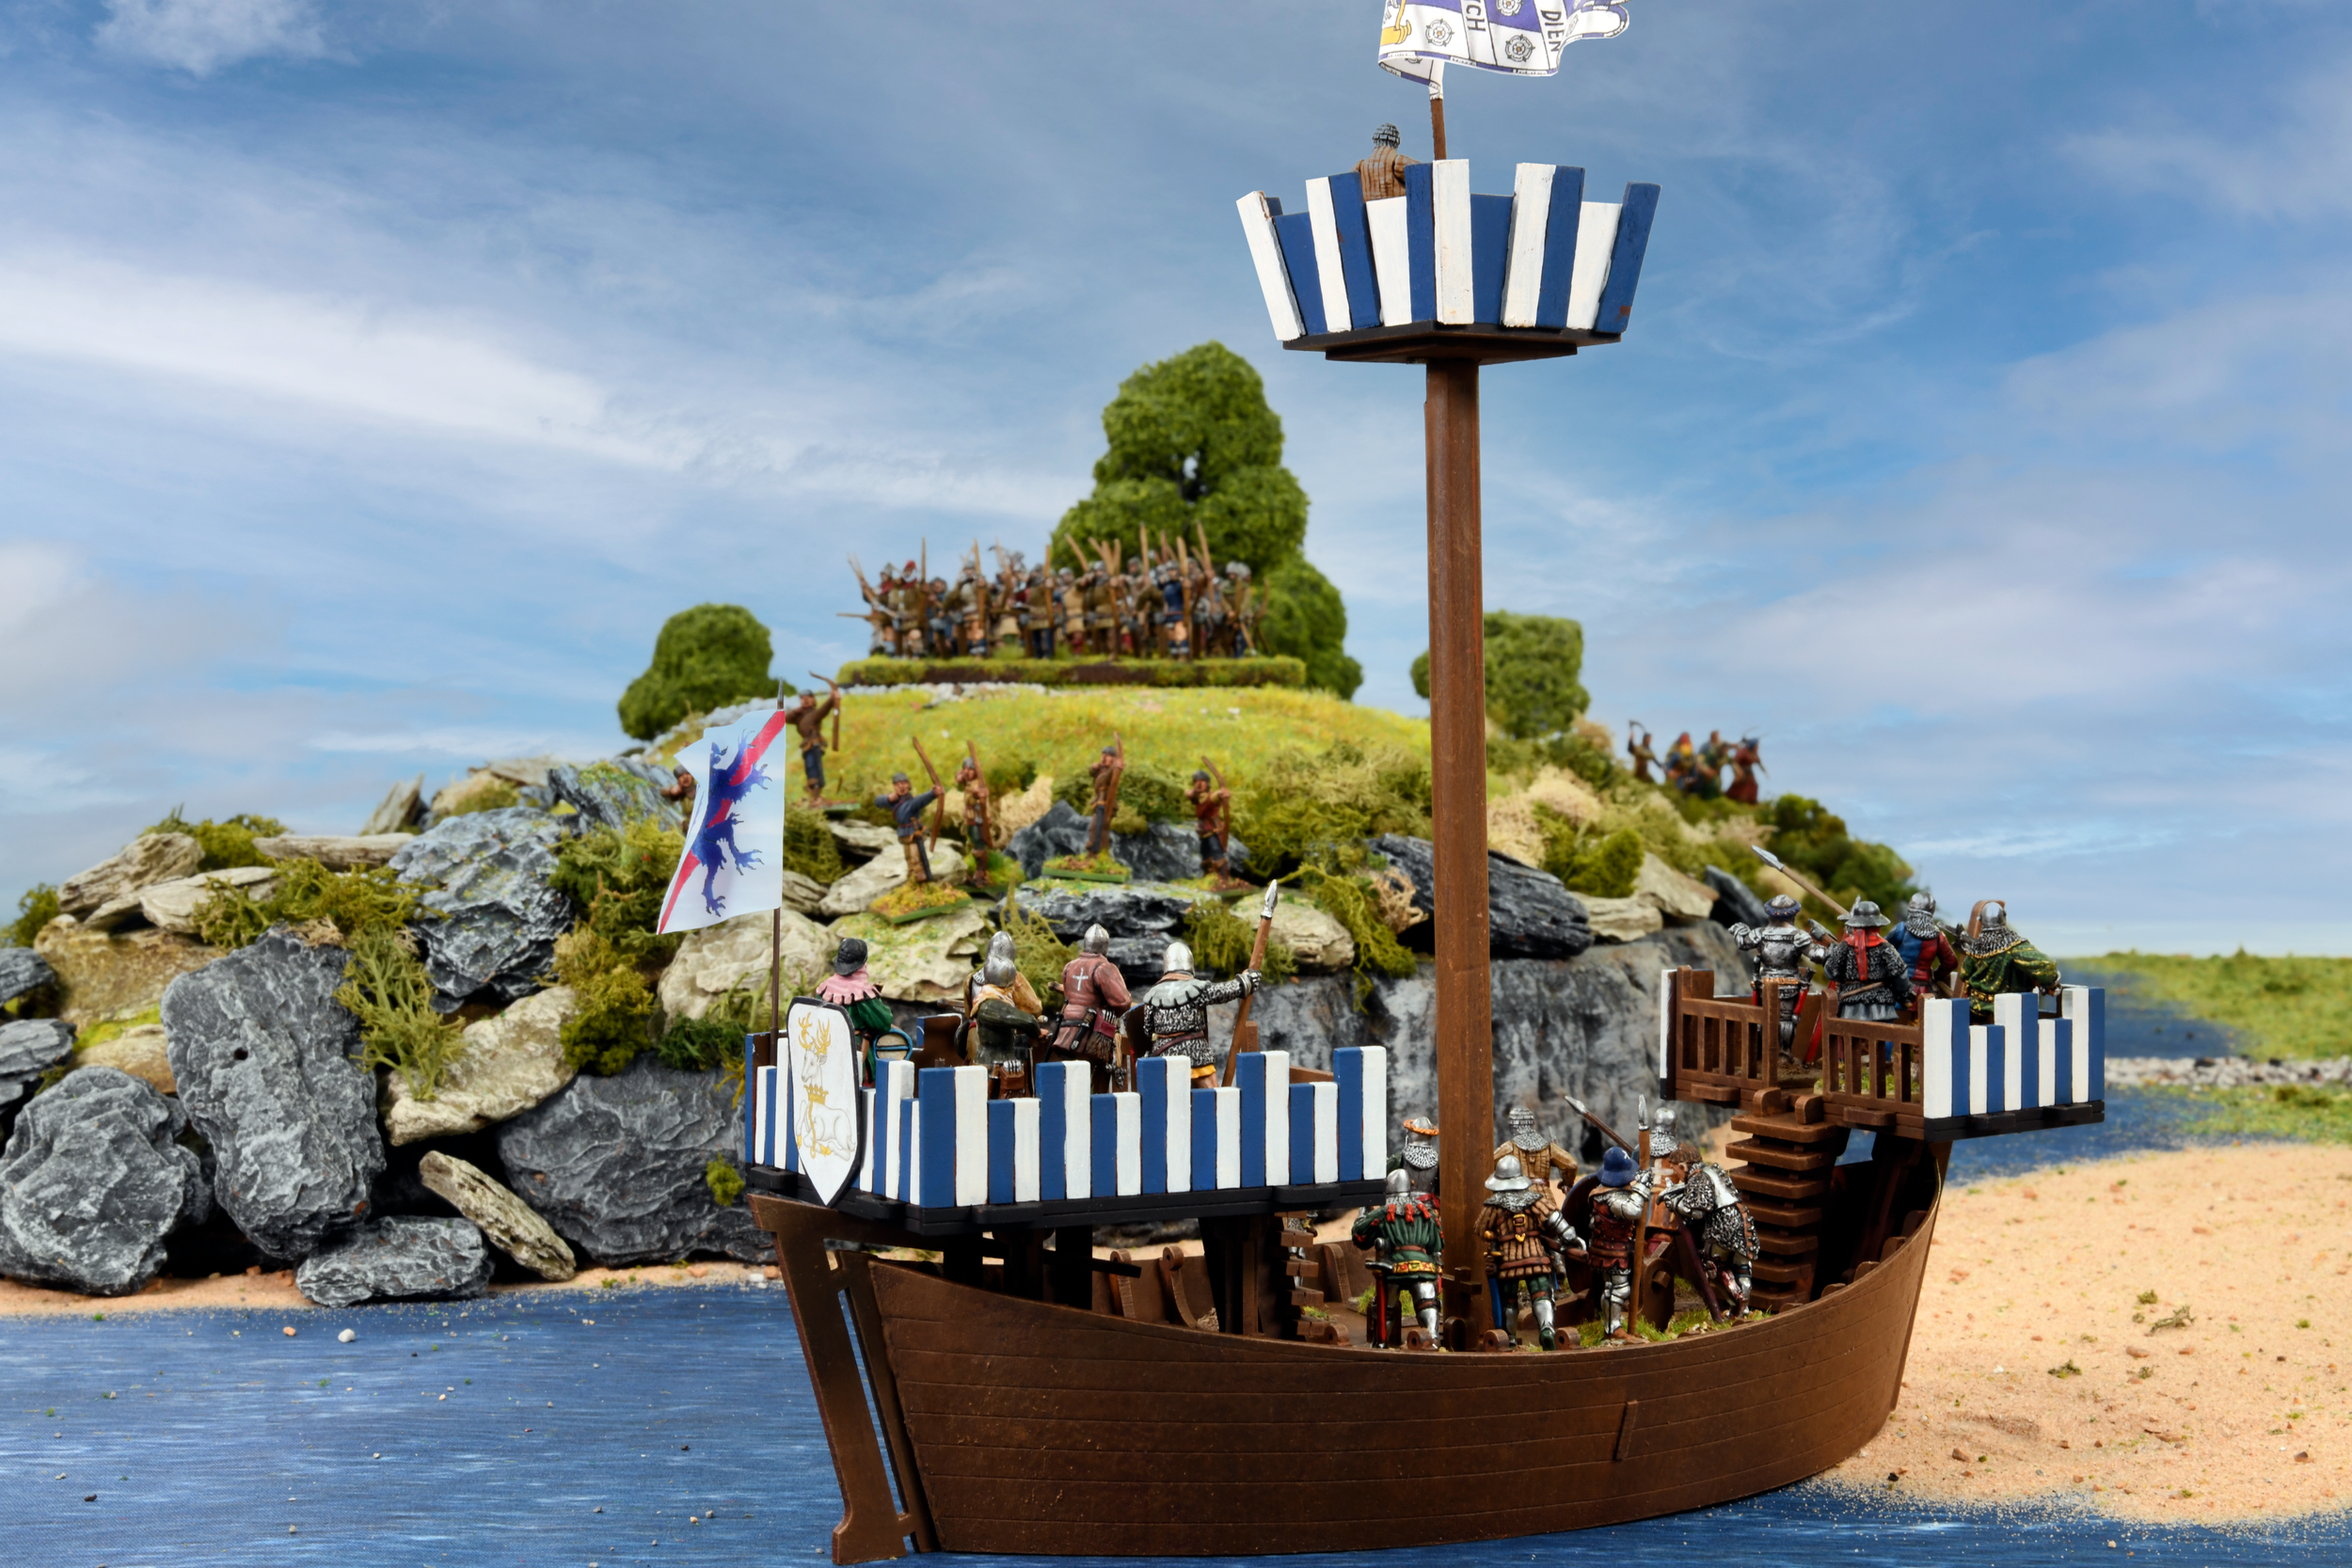
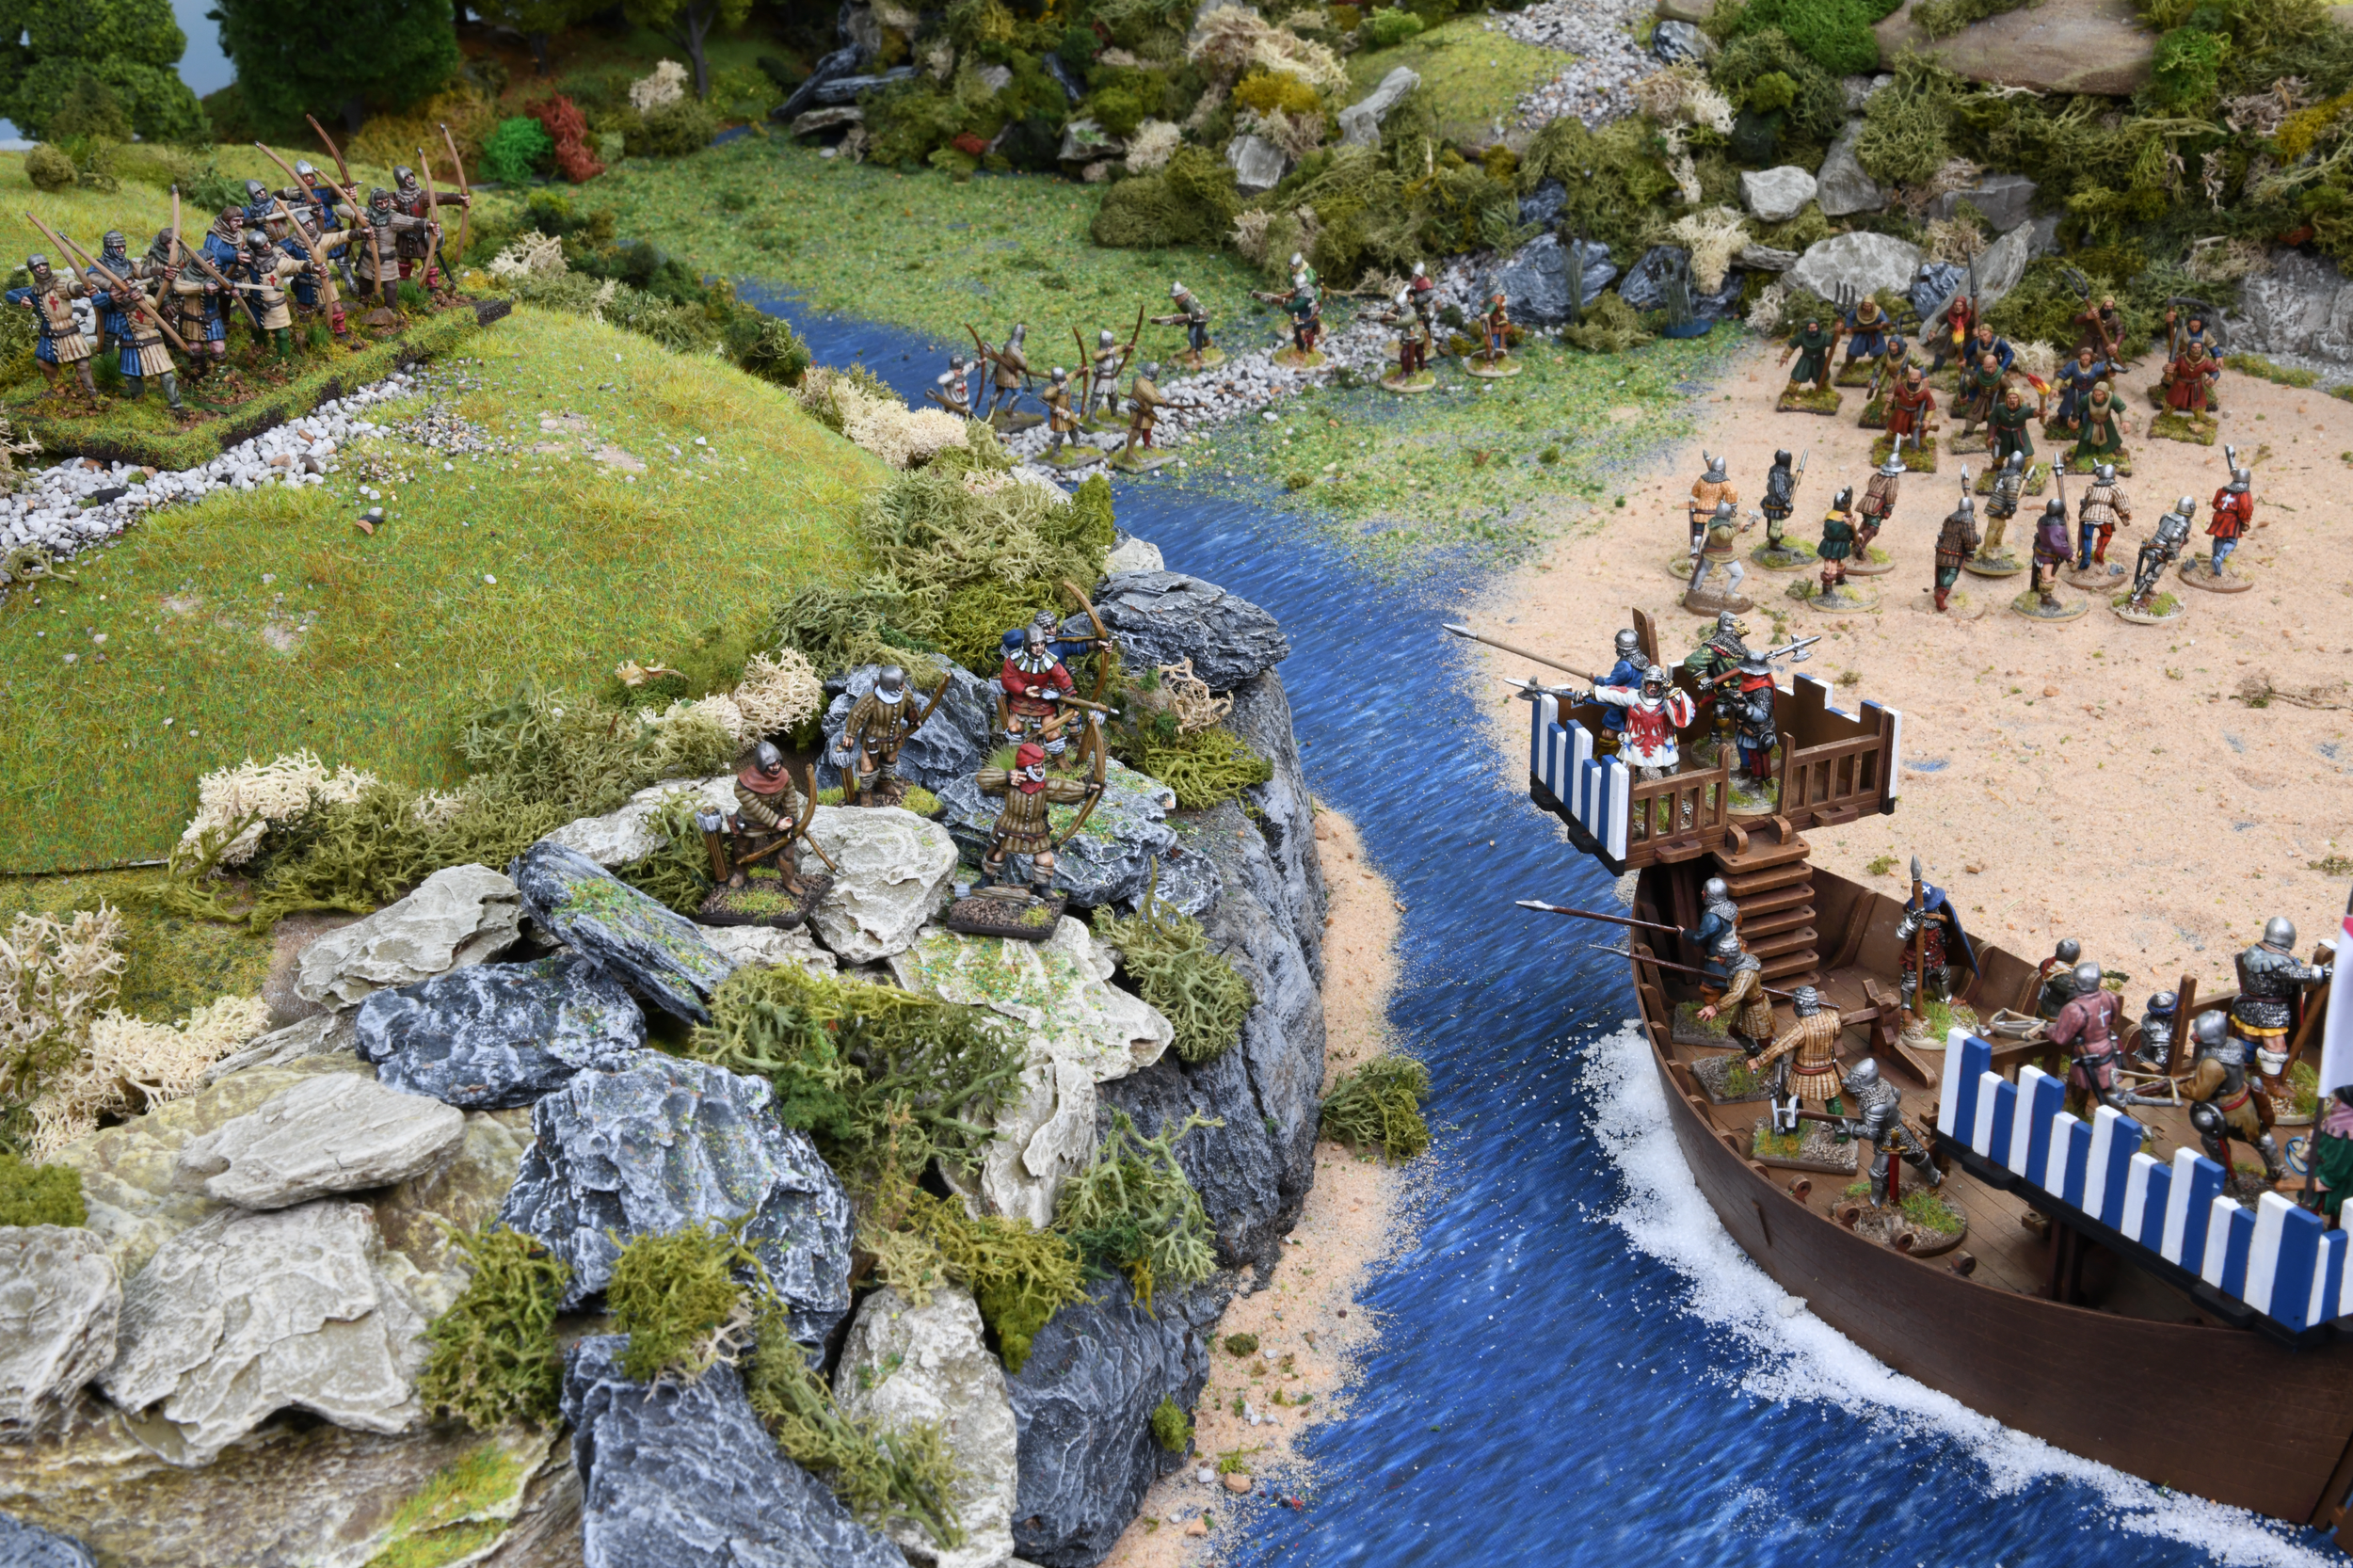
Those dastardly Breton raiders come ashore. Figures by Perry Miniatures. Boat (Cg) by Sarrissa Precision - thanks to Steve Wood for the loan.

The locals stand firm in the face of the foreign threat, as the raiders make for the slope - their only way off the beach. Figures by Perry Miniatures.
The rest of the fleet sailed on, no doubt somewhat the worse for wear, and arrived off Dartmouth in a scattered condition. The new harbour defences seem to have ruled out a direct attack, so du Chastel dithered around in the offing for six days before enough of his ships had assembled for him to feel confident enough to make a landing.
Since Dartmouth lies on the west bank of the river, it made sense to look further west and attack from the landward side. Slapton Sands was, then as now, an ideal place for amphibious operations (and was to be used to practice the D-day landings 500 years later), and this is the most likely landing ground. Chateaubriand's departure and poor sailing discipline had left the invading forces badly depleted – although surely not reduced to the mere 200 men-at-arms claimed by the French Chroniclers – but once ashore, they formed up and marched eastwards along the coast road (now the A379).
They were brought up short at Blackpool Sands, where the road crosses a stream which runs into the sea through a wooded and steep-sided valley. On the opposite slopes, they could see an impressive-looking English force, drawn up in battle order. The defenders had been given plenty of time to raise the local county militia, but there were certainly nowhere near the 6,000 men claimed to excuse what happened next.
Du Chastel, given his earlier caution, no doubt would have preferred to withdraw or at least find a way round this formidable position, but he was taunted with cowardice by de Jaille, who claimed it would be an insufferable insult to their honour to be deterred by mere peasantry. An experienced commander like du Chastel should have known better, but faced with such an accusation, he was stung into action.
He hastily launched a direct assault with his heavy infantry, neglecting to make any use of the accompanying crossbowmen and light troops who might have served better in such difficult terrain.
The English had dammed the stream (there may have been mill sluices already available since the eastern slopes just inland are still known as Millhill), so anyone attempting to cross the valley, except along the road's causeway, floundered in the mud. Ranked in companies on the hillside, the English archers poured a heavy arrowstorm on the head of the enemy assault column while the massed billmen waited to chop down any survivors. Any of the invaders attempting to work their way across the beach and scramble up the cliffs to the East were met by volleys of stones, ordure and anything else that might have been available thrown down on them by the local countrywomen and Dartmouth fishwives (Never mind the Pollocks?).
It was an unmitigated disaster for the invaders - they attempted to withdraw to the ships, but in a hot pursuit, the English captured 100 prisoners, including 3 lords and 22 knights, amongst whom were two of du Chastel's brothers. The numbers of Breton dead are unrecorded but must have been substantial. Admiral du Chastel refused to flee and went down fighting.
News of this remarkable victory by local levies over professional soldiers soon reached king Henry and he ordered a Te Deum in Westminster Abbey to give thanks for this deliverance.
Unfortunately, like most battles, this one had no lasting consequences, and the coastal raids continued unabated. But the following year when the famous Castilian knight errant/pirate (depending on your point of view) Pedro Niño led a fleet of galleys along the Channel coast he took note of du Chastel's defeat and “seeing fair troops of soldiers and archers coming up on all sides to defend the shore” he wisely decided to give Dartmouth a wide berth.
Note: there will be more about Pedro Niño and his amphibious operations in the Hundred Years War in the forthcoming Billhooks2 book. Watch this space!

John Hawley and his archers. Figures by Perry Miniatures.
John Hawley of Darmouth
John Hawley (c1340-1408) might best be described as an early example of a West Country 'Sea-Dog'. Part respectable merchant and citizen (he served 14 times as Mayor of Dartmouth and 4 times as its Member of Parliament) and part unscrupulous pirate, he was probably the inspiration for “Schipman of … Dertemouthe” in Geoffrey Chaucer's Canterbury Tales.
Chaucer visited Dartmouth in 1373, in his capacity as Customs officer for Henry III, to inquire into the reported seizure of cargo from a merchant of Genoa, which is just the sort of dubious activity Hawley was noted for.
“Nice conscience was a thing he never kept...
He well knew all the havens as they were,
From Gottland to the cape of Finisterre,
And every creek in Brittany and Spain,
His vessel had been christened Madeleine”

John Hawley brass - Church of St. Saviour Devon.

We used a Perry Miniatures Agincourt Knight to act as our John Hawley.
Six years later, the 'Magdaleyne of Dertemuth' was one of seven local vessels named in a licence granted to Hawley and two fellow Devonians to make war upon the king's enemies by sea.
Sea-borne trade was risky at the best of times, and in this period of more or less constant warfare (open or undeclared) between England and her enemies, no merchant vessels were safe from the attentions of unscrupulous rival sea captains, especially out of sight of land. Captured crews were routinely thrown overboard to leave no witnesses, and the authorities would often turn a blind eye to such piracy so long as the royal coffers got their share of any plunder. These activities might be semi-legalised by the contemporary equivalent of Privateering licences or letters of marque, but it was very much a grey area and captions like Hawley and his equally famous contemporary, Harry Paye of Poole ('Arripaye' to the Spanish and French) were experts at sailing close to the wind, both literally and metaphorically.
Hawley was recognised as a useful rogue, but one who could be relied upon to get things done. So, he was chosen to enact a royal commission to fortify the entrance to Dartmouth harbour. He did by constructing a small fort ('Hawley's Fortalice) on the West bank of the Dart connected by chain to the opposite bank at Godmerock. Little now remains of the original works, but Hawley knew his stuff as the surviving Tudor fortifications were built on the very same sites.
Arguably, the 1404 raid was deterred from a direct attack on Dartmouth by the presence of these new defences, which so made possible the victory at Blackpool Sands.
This may have been Hawley's finest hour, but he was soon back to his old ways, and just two years later, he was briefly a prisoner in the Tower accused of despoiling some Barcelona merchants, only to be released when local supporters pledged the enormous sum of £3000 to secure his bail.
The old pirate died in his bed in 1408, having made provision for his immortal soul by building a chancel in the Church of St. Saviour's where he lies buried with a fine brass memorial plaque.

The Hawley coat of arms.

We will fight them on the beaches! Hawley’s men (1st Corps, Fireforge, and Perry Miniatures) clash with the (Perry) raiders.
Blackpool Sands - The Wargame
Today, Blackpool Sands is as pretty a spot as you could wish to find on the South Devon Coast. But look beyond the cafe and the picture-perfect beach and it's easy to see why it was chosen by the locals for a defensive position 600 years ago.
The valley sides are steep and wooded, and the stream still forms deep pools (hence the name) even without any artificial damming. The cliffs to the west of the bay are unscalable (unwary trippers still get cut off at high tide at Jenny Cole's Cove) and are equally steep to the East except where some landslip allows for a scrambled ascent.
For game purposes, here is a simplified version of the terrain which takes in all of the tactically significant features. This is a small battle, so it only needs a small table – perhaps 4 feet square. Or you could play lengthwise along a standard 6 x 4 table. There is no room for any fancy outflanking manoeuvres here!

Blackpool Sands, Devon, England. As it is now.
Notes
1. The valley should be at least a bowshot (15 inches) wide but no more than two feet.
2. The causeway should be only wide enough for a company column of troops 2 abreast (e.g a typical 2-rank company sabot base, with the men turned through 90 degrees). Any troops entering or leaving the causeway must change formation to do so (this counts as two actions). A company column fighting on the causeway counts its first two ranks (so, four figures in total) in the first round of Melee.
3. Any units (including Skirmishers) attempting to wade the flooded areas treat them as Bad Going – they move only 4ins per Move Action and are automatically disarrayed. If shot at while in the water, they go down one armour class for their Saving Throws (since they are too busy keeping their footing to take any care against arrows).
4. The only part of the coastline where troops can climb up from the beach is at point 'A'. Apply the same Bad Going penalties as above.
5. Any armoured troops (Men-at-Arms and Billmen) moving on the Beach treat it as “normal” Bad Going (so they move 4 inches but make unadjusted saving Throws).

We constructed out 4 × 4 board using a Deep Cut Studios sea mat covered with copious amounts of fine sand, lichen, bark rocks from Adrian’s Walls, and hills by Debris of War (amongst others).

Blackpool map.
The Armies
This is a relatively small affair, so roughly 100 points a side should do it. In reality, the invaders were heavily outnumbered, but I have evened things up here to make more of a game of it. Feel free to adjust the numbers to suit the size of your collections - Billhooks has no fixed figure:man ratio!
The defenders always deploy first. Any troops in the woods start hidden from the enemy.
The Invaders
Deploy anywhere to the West of the stream between the woods and the clifftop.
Leaders:
Admiral du Chastel (Level 2, Commander). Commander-in Chief 0 points
Seigneur de Jaille (Level 1, Dolt). Second in command, 5 points
96 army points made up from a combination of the following troops, but including at least one unit of each type:
Company of 12 Men-at-Arms (Heavy armour, 24 points) (no more than one of these)
Company of 12 Billmen (generic polearms, Medium armour, 12 points)
Band of 6 Crossbowmen (Skirmishers, Light armour, 6 points)
Band of 6 Skirmishers (sailors with various weapons, no armour, 6 points) (treat them the same as Irish Kern).
Take one Army Morale token for each company (ignore Skirmishers).
Special “Death before Dishonour” Rule:
If de Jailly's card is drawn before du Chastel's on the first turn then he must lead ALL the Men-at-Arms and Billmen in the army on an immediate direct assault on the English position. Henceforth, for orders purposes only, he counts as a Hero and can give attack orders to up to 3 units per turn. These orders cannot be rescinded or over-ruled by the Army Commander unless de Jaille is killed in action.
Morale:
All troops are rated as 'Retinue'. The army loses the battle if it has no Morale Tokens left when it has to give one up.

The Defenders
Leader:
’Captain’ John Hawley (Level 2, Commander). Commander-in-Chief, 0 points.100 army points made up of a combination of the following troops but at least 50 points worth of Archers (in companies or bands) and at least one unit of every type listed.
Company of 12 Archers (Levy, no armour, 9 points).
Company of 12 Billmen (Levy, light armour, 9 points).
Band of 6 Archers (Skirmishers, no armour, 6 points).
Rabble Mob of 20-24 enrage peasantry, including up to 6 archers (Levy, no armour, 12 points).
Band of 6 Fishwives (Skirmishers with assorted throwing weapons, range 6”, 6 points).Take one Morale token for each company or mob (ignore Skirmishers).
Special Rules: These follow the suggestions for ‘Rebels and Rabbles’ set out in my Never Mind the Pitchforks article in Wi402 (see table below).

Command and Control
Hawley is a Level 2 commander, so he can give 2 orders per turn to units within his command radius (6 inches) whenever his card is drawn.
(Note: there is no firm evidence that Hawley was in command on the day of battle, but clearly somebody was, and it was someone who knew his business!).
Skirmishers are activated when their card is drawn, as usual.
Other English units may only be activated when a Bonus card is drawn. Do a dice-off for each card in the normal way. Then:
If the English Player wins the dice-off, he gets the card and can activate two units (up to two actions each).
If the dice-off is drawn, nobody gets the card, but the English Player can activate one unit.
If the English Player loses the dice-off, he cannot activate any units, and the opposition gets the card.
Any missile-armed unit that is not activated during a turn can shoot once at the end of the turn in the normal way. But it can only rally off a Disarray marker if it was not shot at during the turn.
Shooting
Troops on a hillside can shoot over the heads of friends lower down. The target must be at least 6 inches beyond the intervening friendly troops.
Figures
Anything Agincourt era will do, so the Perry 28mm plastic range makes an obvious starting point. Any English troops you use should be very short on armour. The peasants and fishwives are harder to source but the Fireforge “Northmen Folk Rabble” give you both men and women together with plenty of spare bits for kitbashing. I have successfully combined these with Gripping Beast Dark Age Warriors to make some suitably rough-looking medieval mobs.

Morale
All English troops are rated 'Levy' here for Morale purposes (so they must re-roll one dice roll of 6 whenever they take a Morale Crisis Test). The army loses the battle as soon as it gives up its last morale token.
Special Event Cards
If the 'Treachery' card is played, the affected unit will always march off the battlefield rather than change sides. 'Fauconberg's Gambit' can be played on any missile-armed troops, not just Archers.
Flags and Heraldry
Nothing is known for certain, but the English probably used the 'national' cross of St. George as a battle flag here, so giving the Bretons their contemporary equivalent of a black cross on a white background would make a nice contrast.
The Hawley family coat of arms is preserved in a local church.
The Wikipedia article on the battle of Blackpool Sands gives speculative arms for the du Chastel and de Jaille families.

By Andy Callan